In this blog, I describe List-Unsubscribe. Google and Yahoo have made List-Unsubscribe mandatory since 2024. It helps protect sending reputation and makes it easier for recipients to unsubscribe from emails. Some email providers, such as Google and Yahoo, will therefore require the one-click unsubscribe option starting in June 2024. This mainly applies to marketing emails or emails sent to many recipients. I personally chose to modify the headers of all outgoing messages from the Exchange Servers I manage and add a List-Unsubscribe.
Companies are therefore legally required to include an unsubscribe option in their emails.
Adding List-Unsubscribe to the header of a message is one way to comply with this legal requirement. If they don’t, an unsubscribe option must be added to the body of the email.
Should you be concerned about this requirement?
In the world of email, there are many elements to juggle when developing a new strategy—from segmentation and open rates to optimizing your deliverability. It’s easy for something to slip through the cracks.
Yes, actually. Consumers complain that many legitimate emails end up in spam. In this blog, I’ll also show what SMTP server administrators should do.
What is the List-Unsubscribe header that is mandatory as of 2024?
Let’s start from the beginning. A ‘header’ contains technical information that you add to email messages, such as sender, subject, and time of sending. The receiving mail server picks up this information and processes it during the delivery and display of the email. Senders can also add custom headers to emails to give instructions to the receiving system. The reader does not see this information unless they view the source code. For example, you add a DKIM header to prove the authenticity of the sender. You can do the same with List-Unsubscribe.
Note: We’ll discuss DKIM and DMARC in another blog.
List-Unsubscribe mandatory since 2024 by Google and Yahoo
This is an (theoretically) optional email header that allows email recipients to unsubscribe from receiving emails without clicking on an unsubscribe link or marking the sender as spam or junk. Because recipients can opt out instead of unsubscribing or filing a spam complaint, using List-Unsubscribe protects the sender’s reputation.
There are several options, besides a footer link, that a sender can use to comply with this legal requirement, including placing unsubscribe links or instructions in the body of the email or using optional headers like List-Unsubscribe. List-Unsubscribe is widely considered a best practice to meet CAN-SPAM element number 5.
How to add List-Unsubscribe headers
Many inbox providers use the List-Unsubscribe header, including Gmail, Yahoo! Mail, iOS Mail, and Microsoft inboxes such as Outlook. Senders can then choose between two methods for List-Unsubscribe: mailto: or https:.
In short, mailto: is email-based and http: is web-based.
List-Unsubscribe with mailto: mandatory since 2024 by Google and Yahoo
This type of List-Unsubscribe sends an unsubscribe request in the form of an email to a specified email address.
List-Unsubscribe with http mandatory since 2024 by Google and Yahoo
This type of List-Unsubscribe uses a URL to handle the POST requests triggered by an unsubscribe action. Each inbox provider handles List-Unsubscribe differently and has different requirements and expectations for senders who plan to use List-Unsubscribe, so keep these guidelines in mind when strategizing.
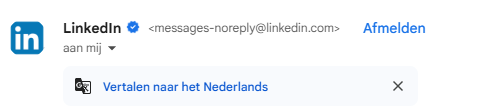
List-Unsubscribe header in Gmail
In Gmail, the List-Unsubscribe header appears as a hyperlink in the dropdown menu next to the “To” field, as indicated by the red arrows in the image below.
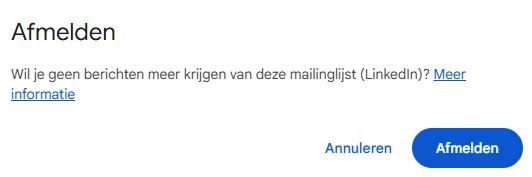
Clicking on “more information” will take you to the following link.
Gmail considers List-Unsubscribe a best practice that all senders should implement. That said, senders with a strong sending reputation will experience the best functionality from this tool.
Gmail’s implementation of List-Unsubscribe supports both the mailto: and http: methods, giving senders the flexibility to choose whichever works best for their email setup. However, Gmail prefers the mailto: option and frequently recommends it over the http: method.
List-Unsubscribe Header in Microsoft Outlook
To enable List-Unsubscribe on their platform, Microsoft requires senders to have a good sending reputation. In addition, Microsoft only allows senders to use the mailto: method when enabling List-Unsubscribe.
List-Unsubscribe Header in iOS Mail
In iOS Mail, the List-Unsubscribe header appears at the top of the message, above the sender information, as indicated by the red arrow in the image below.
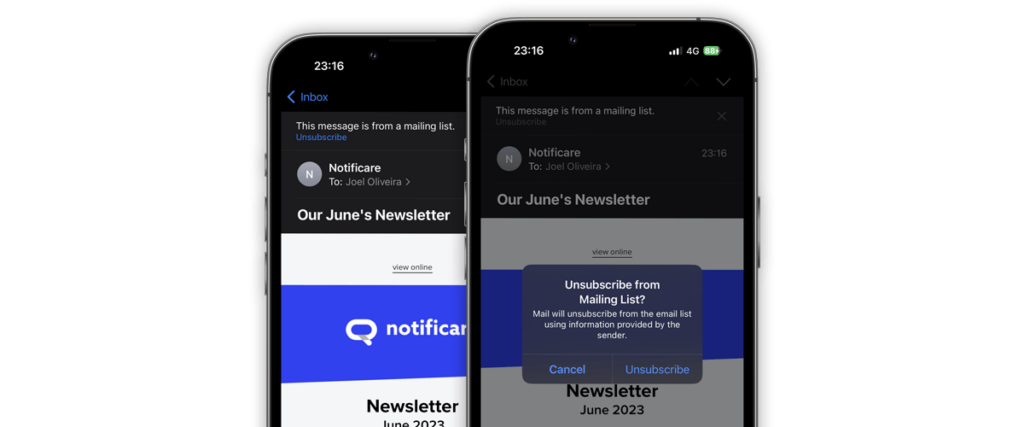
Just like Microsoft, iOS Mail requires senders to use only the mailto: method.
How should marketers use List-Unsubscribe, which has been mandatory since 2024?
Although having a prominent unsubscribe function at the top of your messages might seem intimidating, there’s no reason to worry. Having this feature is beneficial for your email program!
List-Unsubscribe not only improves the user experience by providing an easy-to-use unsubscribe button, but it also helps keep your contact list healthy and engaged, and can enhance your sending reputation.
Having a List-Unsubscribe function in your header offers an easy opt-out for recipients, which means they don’t have to search for a hard-to-find unsubscribe link in the body or footer of your email if they no longer want to receive communications.
Making it difficult for recipients to unsubscribe can result in spam or junk complaints, which may harm your sending reputation. The user experience improves with easier access to unsubscribe options — which is ultimately great for marketers.
What about consumers?
One thing to keep in mind with List-Unsubscribe is that it doesn’t exempt you from setting (and respecting) email expectations with your recipients. You should still consider allowing recipients to specify their email preferences at the time of opt-in.
In the 2019 Email Benchmark and Engagement Study, we found that recipients overwhelmingly preferred to specify their preferences during the opt-in process rather than at a later point. By respecting your recipients’ preferences from the beginning, you’re more likely to maintain healthy open and engagement rates, as opposed to sending every message to every contact on your list.
If recipients receive emails they didn’t expect or sign up for, they’re more likely to unsubscribe.
Sidebar: If your business works with or sends commercial emails to the European Union, there are restrictions on how and to whom you can send certain messages under the General Data Protection Regulation (GDPR). Check out our blog post on GDPR for everything you need to remember when working with EU citizens.
Adjusting Header within Exchange Online
Since I’m the administrator of two Exchange Server environments, I’m able to test and describe this process myself. For other mail servers, this is done differently.
Access the Exchange Admin Center (EAC)
- Go to the Exchange Admin Center
- Log in with your admin account
Create a new transport rule
- In the EAC, navigate to Mail flow > Rules
- Click Add a rule and select Create a new rule
Configure the rule
- Give the rule a unique name, e.g., “Add List-Unsubscribe Header”
- Under Apply this rule if…, select The sender is… and specify the sender(s) you want the rule to apply to
- Add extra conditions if necessary by clicking Add condition
Set the action
- Under Do the following…, select Modify the message properties > Set a message header
- Enter the following details:
- Header name:
List-Unsubscribe - Header value:
<mailto:unsubscribe@example.com>or<https://example.com/unsubscribe>or both via<mailto:unsubscribe@example.com>, <https://example.com/unsubscribe>
- Header name:
Save and test the rule
- Click Save to store the rule
- Test the rule by sending an email and verifying that the List-Unsubscribe header has been added correctly
Monitor and adjust the rule
- Monitor the rule’s performance and adjust it if needed
- For more detailed information about managing transport rules, consult the Microsoft Learn page
How does this work in practice?
Sending a marketing list via email involves several technical steps. Here’s an overview of the process:
Preparing the email list:
- The email list is compiled with the contact details of the recipients
- Each contact receives a unique identifier (ID) in the database
Generating unique elements:
- A unique message ID is generated for each email — this helps with tracking and managing individual messages
- A unique unsubscribe URL is generated for each recipient — this URL contains a token or ID specific to the recipient
Sending the emails:
- The emails are sent via an email server or marketing platform
- The message ID and unsubscribe URL are included in the email
Storing data in the database:
- The message ID and unsubscribe URL are stored in the database and linked to the recipient
Unsubscribing via one-click:
- When a recipient clicks the unsubscribe URL, they are directed to an unsubscribe page
- The page reads the unique token or ID from the URL and queries the database to identify the recipient
- The recipient is then unsubscribed and either removed or marked as unsubscribed in the database
This process ensures that each email can be accurately tracked and that unsubscribes are processed efficiently.
Simulation via PowerShell
Since I’m currently working a lot with PowerShell, I attempted to clarify this process through scripting. Unfortunately, I wasn’t able to store the token in the MySQL database — this requires more knowledge of PHP — but I did manage to populate the List-Unsubscribe header with a unique message ID and unsubscribe URL. You can also define this in your transport rule using the following:
Header value: <mailto:unsubscribe@example.com> or <https://example.com/unsubscribe> or both via<mailto:unsubscribe@example.com>, <https://example.com/unsubscribe/opaque-identifier=unique-id>
The PowerShell script below illustrates this.
# Function: Generate a new Opaque Message ID (Safe for URLs)
function New-MessageId {
    return [guid]::NewGuid().ToString()  # Generates a clean unique ID
}

# Function: Send an Email with a List-Unsubscribe Header
function Send-Email {
    param (
        [string]$userEmail
    )

    # Load the MailKit and MimeKit assemblies
    Add-Type -AssemblyName "MailKit"
    Add-Type -AssemblyName "MimeKit"

    # Generate a unique, safe Opaque ID for tracking
    $opaqueId = New-MessageId

    # Construct the unsubscribe URL with the Opaque ID
    $unsubscribeLink = "https://www.digitalemels.nl/unsubscribe-vanuit-ontvangen-email/?messageId=" + $opaqueId

    # Create email message
    $message = New-Object MimeKit.MimeMessage
    $message.From.Add([MimeKit.MailboxAddress]::new("Your Name", $userEmail))
    $message.To.Add([MimeKit.MailboxAddress]::new("Recipient", $userEmail))
    $message.Subject = "Unsubscribe from our newsletter"

    # Set a standard Message ID for email servers (not for unsubscribe tracking)
    $message.MessageId = "<" + $opaqueId + "@digitalemels.nl>"

    # Add the List-Unsubscribe header
    $message.Headers.Add("List-Unsubscribe", "<mailto:$( $userEmail )?subject=unsubscribe>, <$( $unsubscribeLink )>")

    # Create email body
    $textPart = New-Object MimeKit.TextPart("plain")
    $textPart.Text = "Click here to unsubscribe: $unsubscribeLink"
    $message.Body = $textPart

    # Configure SMTP client
    $smtp = New-Object MailKit.Net.Smtp.SmtpClient
    $smtp.Connect("smtp.gmail.com", 587, [MailKit.Security.SecureSocketOptions]::StartTls)
    $smtp.Authenticate("$userEmail", "$appPassword")  # Replace with your App Password

    # Send email
    $smtp.Send($message)
    $smtp.Disconnect($true)

    Write-Output "Email sent successfully with Opaque ID: $opaqueId"
}

# Function: Process Unsubscribe Request Using Opaque ID
function Test-MessageId {
    param (
        [string]$messageId
    )

    # Example: Check if Opaque ID is valid (this would normally query a database)
    Write-Output "Processing unsubscribe request for Opaque ID: $messageId"

    # If valid, mark the user as unsubscribed (this is a placeholder)
    Write-Output "User has been unsubscribed successfully."
}

# Call Send-Email function to send an email
Send-Email -userEmail $userEmail
Test-MessageId -messageId $opaqueId
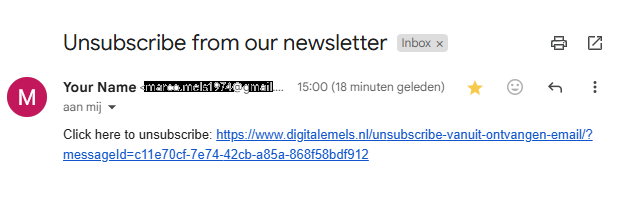
The corresponding header then looks as follows:
Return-Path: <REMOVED@gmail.com>
Received: from P-0F39GWB24133 (2a02-a453-6555-1-3c07-7fe1-f9f0-5d1c.fixed6.kpn.net. [2a02:a453:6555:1:3c07:7fe1:f9f0:5d1c])
by smtp.gmail.com with ESMTPSA id a640c23a62f3a-ac3efb65899sm514851666b.104.2025.03.23.07.00.33
for <REMOVED@gmail.com>
(version=TLS1_3 cipher=TLS_AES_256_GCM_SHA384 bits=256/256);
Sun, 23 Mar 2025 07:00:34 -0700 (PDT)
From: Your Name <REMOVED@gmail.com>
Date: Sun, 23 Mar 2025 15:00:33 +0100
Subject: Unsubscribe from our newsletter
Message-Id: <c11e70cf-7e74-42cb-a85a-868f58bdf912@digitalemels.nl>
To: Recipient <REMOVED@gmail.com>
List-Unsubscribe: <mailto:REMOVED@gmail.com?subject=unsubscribe>, <https://www.digitalemels.nl/unsubscribe-vanuit-ontvangen-email/?messageId=c11e70cf-7e74-42cb-a85a-868f58bdf912>
MIME-Version: 1.0
Content-Type: text/plain; charset=utf-8
Click here to unsubscribe: https://www.digitalemels.nl/unsubscribe-vanuit-ontvangen-email/?messageId=c11e70cf-7e74-42cb-a85a-868f58bdf912
Not Always Visible
The unsubscribe button is not always visible for several reasons:
Email client limitations: Some email clients, such as certain versions of Outlook, may not support the display of the unsubscribe button, even if it is correctly implemented.
Incorrect implementation: If the List-Unsubscribe headers are not properly configured according to the specifications, the button may not appear. This can happen if there are errors in the email server configuration or in the headers themselves.
Spam filters: Emails flagged by spam filters may have the unsubscribe button hidden to prevent users from accidentally clicking on malicious links.
Email design: Sometimes the design of the email makes the unsubscribe button hard to find, for example if it is placed too far down the message or styled in a color that’s hard to see.
If you’re having specific issues with the visibility of the unsubscribe button, it can be useful to check the configuration and implementation of your email headers and test in various email clients.
Additional Notes for Gmail
If the unsubscribe button in Gmail is not visible, even when the List-Unsubscribe header is correctly defined, there may be several causes:
Sender trust and reputation:
Gmail only shows the unsubscribe button for senders with a high reputation. If your domain or IP address has a low reputation, Gmail may decide not to show the button.
Complex algorithms:
Gmail uses complex algorithms to determine when to display the unsubscribe button. Even if the headers are technically correct, Gmail may choose not to show the button based on other factors.
Previous unsubscriptions:
If a recipient has already unsubscribed using the unsubscribe button, Gmail may not display the button again for the same sender.
Email content and formatting:
The content and layout of your email can also affect the visibility of the unsubscribe button. Make sure your emails follow best practices for email marketing and are not flagged as spam.
To resolve this issue, consider the following steps:
- Use a reliable email marketing platform that can help manage unsubscribes and improve sender reputation.
- Improve your sender reputation by maintaining a clean email list and only emailing recipients who have opted in.
- Test your emails in various Gmail accounts to verify if the unsubscribe button is visible.
Having said, List-Unsubscribe can be considered as mandatory since 2024. More information about Microsoft Exchange Server can be found here. More information about the author of this blog post can be found here.