Microsoft, of course, provides documentation for performing an upgrade. You can find it here.
The steps are broadly outlined as follows:
After that, Microsoft outlines a number of steps:
- Task 1: Install version 26
- Task 2: Upgrade permission sets
- Task 3: Prepare the existing databases
- Task 4: Convert application database to version 26
- Task 5: Configure version 26 server
- Task 6: Import version 26 license
- Task 7: Synchronize tenant
- Task 8: Publish extensions
- Task 9: Synchronize tenant with extensions
- Task 10: Upgrade data
- Task 11: Install new Microsoft or reinstall 3rd-party extensions
- Task 12: Upgrade control add-ins
- Task 13: Install upgraded permission sets
- Task 14: Change application version
Finally, Microsoft also mentions the post-upgrade tasks.
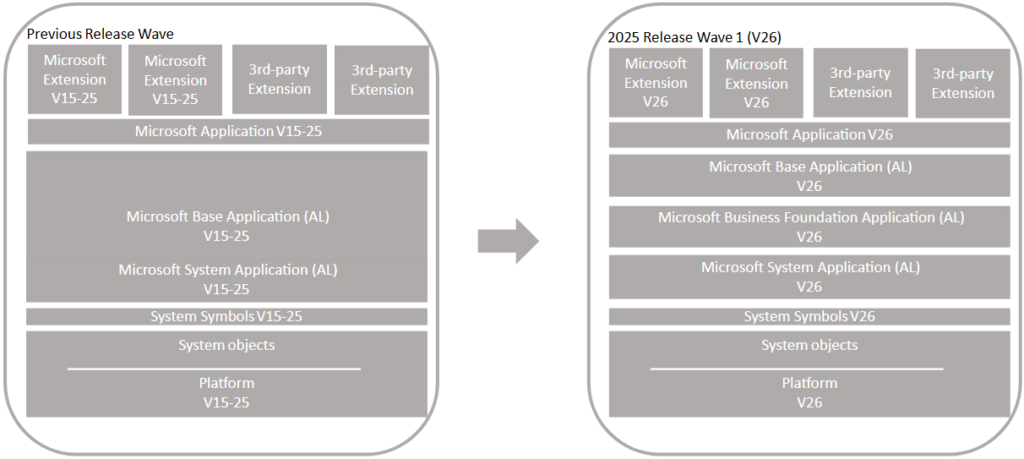
Of course, the very first step is defining the variables. Performing an upgrade requires some planning to define those variables properly. What’s new in this release is that Microsoft no longer removes the old version first—it leaves it in place.
I’ll follow the same approach and load the modules in the usual way.
# Begin Dot-source the PS Variables.ps1 file
. "$PSScriptRoot\PS Variables.ps1"
# End Dot-source the PS Variables.ps1 file

# Begin loading BC250 module
Import-Module $modulePathBC250
# End loading BC250 module
Once we’re done with BC250, we need to restart Visual Studio Code and run the following.
# Begin Dot-source the PS Variables.ps1 file
. "$PSScriptRoot\PS Variables.ps1"
# End Dot-source the PS Variables.ps1 file

# Begin loading BC60 module
Import-Module $modulePathBC260
# End loading BC60 module
Task 1: Install version 26 for performing an upgrade
There’s not much to say here, except the following:
Once the database has been converted, it’s a good idea to create a new backup.
In my test case, I chose a multitenant environment with two databases:
- Production (tenant database)
- PRODAPP (application database)
In a separate blog post, I’ll explain how to add a test tenant.
Task 2: Upgrade permission sets
Not applicable in my case, as I’m upgrading from BC250 (Dynamics 365 Business Central 2024 Wave 2) to BC260 (Dynamics 365 Business Central 2025 Wave 1).
Task 3: Prepare the existing databases
As Microsoft always recommends—now is the time to create a backup.
Since I opted for a multitenant setup, in this step I only need to dismount the tenant and start the instance.
Optionally, you can also create a list of the extensions that are currently installed.
# Begin find out current list of installed extensions
Start-NAVServerInstance -ServerInstance $oldBcServerInstance -Force
Get-NavAppInfo -ServerInstance $oldBcServerInstance | Select-Object Name | Out-File -FilePath "$currentExtensionsPath\BC250Extensions.txt"
# End find out current list of installed extensions

# Begin upgrade database
Dismount-NAVTenant -ServerInstance $OldBcServerInstance -Tenant $TenantId -Force
Stop-NAVServerInstance -ServerInstance $OldBcServerInstance
# End upgrade database
By the way, it’s also time to restart Visual Studio Code.
Task 4: Convert application database to version 26
We will now convert the database using BC260. For convenience, I’ve also included the output.
# Begin conversion of database
Dismount-NAVTenant -ServerInstance $newBcServerInstance -Tenant $TenantId -Force
Stop-NAVServerInstance -ServerInstance $newBcServerInstance
Invoke-NAVApplicationDatabaseConversion -DatabaseServer $DatabaseServer -DatabaseName $applicationDatabase -Force
# Result
# PS C:\Users\admin\Documents\PowerShell\Scripts\Upgrade Major> Invoke-NAVApplicationDatabaseConversion -DatabaseServer $DatabaseServer -DatabaseName $applicationDatabase -Force
# Cloning metadata for app System by Microsoft (26.0.32469.0) with emit version 26025
# Inplace publishing skipped. Emit version 26025 is current.
#
# DatabaseServer      : localhost
# DatabaseName        : PRODAPP
# DatabaseCredentials :
# DatabaseLocation    :
# Collation           :
# End conversion of database
Task 5: Configure version 26 server for performing a major or minor upgrade
The next steps aren’t particularly exciting when it comes to performing a major or minor upgrade — the real work is yet to begin.
# Begin ensure the database name is correctly set
Set-NAVServerConfiguration -ServerInstance $NewBcServerInstance -KeyName DatabaseName -KeyValue $applicationDatabase
Set-NavServerConfiguration -ServerInstance $newBcServerInstance -KeyName Multitenant -KeyValue true
Set-NavServerConfiguration -ServerInstance $NewBcServerInstance -KeyName "EnableTaskScheduler" -KeyValue false
Restart-NAVServerInstance -ServerInstance $NewBcServerInstance
# End ensure the database name is correctly set
Task 6: Import version 26 license
This step is not applicable, because in my test upgrade from BC250 (Dynamics 365 Business Central 2024 Wave 2) to BC260 (Dynamics 365 Business Central 2025 Wave 1) I am using my GAC Business Solutions Partner license.
Task 7: Synchronize tenant for performing a major or minor upgrade
In step 5, we restarted the instance. At that point, we don’t know exactly when the tenant mounting completes.
A helpful tip is to dismount the tenant immediately after restarting, and then mount the tenant again with the correct parameters.
# Begin tenant initialization
Dismount-NAVTenant -ServerInstance $newBcServerInstance -Tenant $tenantId -Force
Mount-NAVTenant –ServerInstance $NewBcServerInstance -Id bc  –DatabaseServer localhost -DatabaseName "Production" -OverwriteTenantIdInDatabase  `
-AlternateId "bc.digitalemels.nl" -DefaultCompany "CRONUS Nederland BV" -DefaultTimeZone "UTC" -EnvironmentType "Production" -DisplayName "CRONUS NL" -AllowAppDatabaseWrite -Force
Get-NavTenant -ServerInstance $NewBcServerInstance -Tenant $TenantId
Sync-NAVTenant -ServerInstance $NewBcServerInstance -Mode Sync -Tenant $TenantId -Force
# End tenant initialization
Task 8: Publish extensions and Task 9: Synchronize tenant with extensions and Task 10: Upgrade data
Now it’s getting interesting. The first few extensions to be handled are System Application, Business Foundation, Base Application, and Application. Best approach is to publish them right away, then synchronize, and finally upgrade the data.
# Begin publishing standard extensions
Publish-NAVApp -ServerInstance $NewBcServerInstance -Path $SystemAppPath
Publish-NAVApp -ServerInstance $NewBcServerInstance -Path $BusFoundAppPath
Publish-NAVApp -ServerInstance $NewBcServerInstance -Path $BaseAppPath
Publish-NAVApp -ServerInstance $NewBcServerInstance -Path $ApplicationAppPath
# End publishing standard extensions

# Begin synchronization of standard extensions
Sync-NAVApp -ServerInstance $NewBcServerInstance -Name "System Application" -Version $NewBCVersion -Tenant $tenantId
Sync-NAVApp -ServerInstance $NewBcServerInstance -Name "Business Foundation" -Version $NewBCVersion -Tenant $tenantId
Sync-NAVApp -ServerInstance $NewBcServerInstance -Name "Base Application" -Version $NewBCVersion -Tenant $tenantId
Sync-NAVApp -ServerInstance $NewBcServerInstance -Name "Application" -Version $NewBCVersion -Tenant $tenantId
# End synchronization of standard extensions

# Begin data upgrade of standard extensions
Uninstall-NavApp -ServerInstance $newBcServerInstance -Name "System Application" -Version $oldBCVersion -Force
Start-NAVAppDataUpgrade -ServerInstance $newBcServerInstance -Name 'System Application'  -Version $NewBcVersion
Start-NAVAppDataUpgrade -ServerInstance $newBcServerInstance -Name 'Business Foundation'  -Version $NewBcVersion
Start-NAVAppDataUpgrade -ServerInstance $newBcServerInstance -Name 'Base Application'  -Version $NewBcVersion
Start-NAVAppDataUpgrade -ServerInstance $newBcServerInstance -Name 'Application'  -Version $NewBcVersion
# End data upgrade of standard extensions
The command Uninstall-NavApp -ServerInstance $newBcServerInstance -Name "System Application" -Version $oldBCVersion -Force is not included in the official Microsoft documentation, but I used it myself while resolving an issue during the data upgrade of the System Application to work around the problem. The following error message appeared:
Start-NAVAppDataUpgrade: Could not upgrade the extension 'System Application' by 'Microsoft' from version '25.5.30849.31109' to '26.0.30643.32481' for tenant 'bc' and company 'CRONUS Nederland BV' due to the following error: 'An unexpected error occurred after a database command was cancelled.'Once all of this is done, the difficult part begins. There are three potential challenges.
Challenges when performing a major or minor upgrade
- New extensions
- Dependencies
- Deprecated extensions
In principle, the steps are as follows:
Publish-NAVApp -ServerInstance $NewBcServerInstance -Path "<path to Microsoft extension>"Sync-NAVApp -ServerInstance $NewBcServerInstance -Tenant $TenantId -Name "$name"Start-NAVDataUpgrade -ServerInstance $NewBcServerInstance -Tenant $TenantId -FunctionExecutionMode Serial -SkipAppVersionCheck- I personally chose to synchronize each extension separately. The command for that becomes
- S
tart-NAVAppDataUpgrade -ServerInstance $newBcServerInstance -Name "$name" -Version $NewBcVersion
- S
- I personally chose to synchronize each extension separately. The command for that becomes
You can download the PowerShell script where all paths and names are correctly configured.
The order and dependencies are also correctly handled. This script only covers the standard Microsoft extensions.
That’s quite a lot of extensions with different names, and the order can change with each new major or minor upgrade. This could definitely be made easier — if there were no dependencies, it would be straightforward.
$extensionFiles = Get-ChildItem -Path "$appPathBC260\$dvdNameBC260\Applications\" -Filter "*.app" -Recurse -exclude "*test*.app", "*library*.app" | Where-Object {@("\\test\\") -notcontains "$_.Name"}
foreach ($extensionFile in $extensionFiles) {
    Publish-NavApp -ServerInstance $newBcServerInstance -Path $extensionFile.FullName -SkipVerification
}
By the way, we filter by the .app extension and exclude as many test extensions as possible using the -Exclude parameter. We use Where-Object to exclude folders named Test. You can exclude additional folders using: {@("\\test\\", "library") -notcontains "$_.Name"}
The same kind of commands apply for synchronizing and upgrading the data.
$extensions = Get-NavAppInfo -ServerInstance $newBcServerInstance -Version $newBCVersion
# Loop through each extension file and sync it
foreach ($extension in $extensions) {
    Sync-NAVApp -ServerInstance $NewBcServerInstance -Name "$extension.Name -Version $NewBCVersion -Tenant $tenantId
    # Start-NAVAppDataUpgrade -ServerInstance $NewBcServerInstance -Name $extension.Name -Version $newBcVersion
}
# End start data upgrade current extensions
These two commands synchronize all extensions included in the $extensies variable.
They do not take the dependency tree into account. Several partners have already shared their insights on this topic — including Waldo.
The following code exports all extensions that have dependencies.
$path = "$appPathBC260\$dvdNameBC260\Applications\"
$AllAppFiles = Get-ChildItem -Path $path -Filter "*.app" -Recurse -exclude "*test*.app", "*library*.app" | Where-Object {@("\\test\\") -notcontains "$_.Name"}
$AllApps = @()

foreach ($AppFile in $AllAppFiles) {
    $App = Get-NAVAppInfo -Path $AppFile.FullName
    $AllApps += [PSCustomObject]@{
        id           = $App.id
        Version      = $App.version
        Name         = $App.name
        Publisher    = $App.publisher
        ProcessOrder = 0
        Dependencies = $App.dependencies
        Path         = $AppFile.FullName
    }
}

# Create a hashtable to store dependencies
$DependencyMap = @{}

foreach ($App in $AllApps) {
    foreach ($Dependency in $App.Dependencies) {
        if (-not $DependencyMap.ContainsKey($Dependency.Name)) {
            $DependencyMap[$Dependency.Name] = @()
        }
        $DependencyMap[$Dependency.Name] += $App.Name
    }
}

# Output the dependencies
foreach ($App in $AllApps) {
    if ($DependencyMap.ContainsKey($App.Name)) {
        Write-Output "App: $($App.Name)"
        Write-Output "  Is depended on by:"
        foreach ($DependentApp in $DependencyMap[$App.Name]) {
            Write-Output "    - $DependentApp"
        }
        Write-Output ""
    }
}
The output, for example, is:App: Exclude_APIV2
Is depended on by:
- Field Service Integration
This means that Exclude_APIV2 must first be published, synchronized, and its data upgraded before we can publish, synchronize, and upgrade Field Service Integration.
Publish-NavApp -ServerInstance BC260 -Path "$appPathBC260\$dvdNameBC260\Applications\APIV2\Source\Microsoft__Exclude_APIV2_.app" -SkipVerification
Sync-NAVApp -ServerInstance $NewBcServerInstance -Name "_Exclude_APIV2_" -Version $NewBCVersion -Tenant $tenantId
Start-NAVAppDataUpgrade -ServerInstance $newBcServerInstance -Name '_Exclude_APIV2_' -Version $NewBcVersion

Publish-NavApp -ServerInstance BC260 -Path "$appPathBC260\$dvdNameBC260\Applications\FieldServiceIntegration\Source\Microsoft_Field Service Integration.app' -SkipVerification
Sync-NAVApp -ServerInstance $NewBcServerInstance -Name "Field Service Integration" -Version $NewBCVersion -Tenant $tenantId -Force
Start-NAVAppDataUpgrade -ServerInstance $newBcServerInstance -Name 'Field Service Integration' -Version $NewBcVersion
And just like that, we’ve been back at it again with PowerShell.
Task 11: Install new Microsoft or reinstall 3rd-party extensions
It’s an easy command to run — but how do you know which extension is new?
With PowerShell, you can generate a list of both the old and the new extensions and compare them to identify the differences.
# For BC260
Get-NavAppInfo -ServerInstance $newBcServerInstance | Format-Table Name | Out-File -FilePath "$currentExtensionsPath\BC260Extensions.txt"

# For BC250
Get-NavAppInfo -ServerInstance $oldBcServerInstance | Format-Table Name | Out-File -FilePath "$currentExtensionsPath\BC250Extensions.txt"

# Read the contents of both files
$bc260Extensions = Get-Content -Path "$currentExtensionsPath\BC260Extensions.txt"
$bc250Extensions = Get-Content -Path "$currentExtensionsPath\BC250Extensions.txt"

# Find extensions that are in BC260 but not in BC250
$newExtensions = $bc260Extensions | Where-Object { $_ -notin $bc250Extensions }

# Output the new extensions
$newExtensions
The output might look as follows:
E-Document Connector – Pagero
E-Document Connector – SignUp
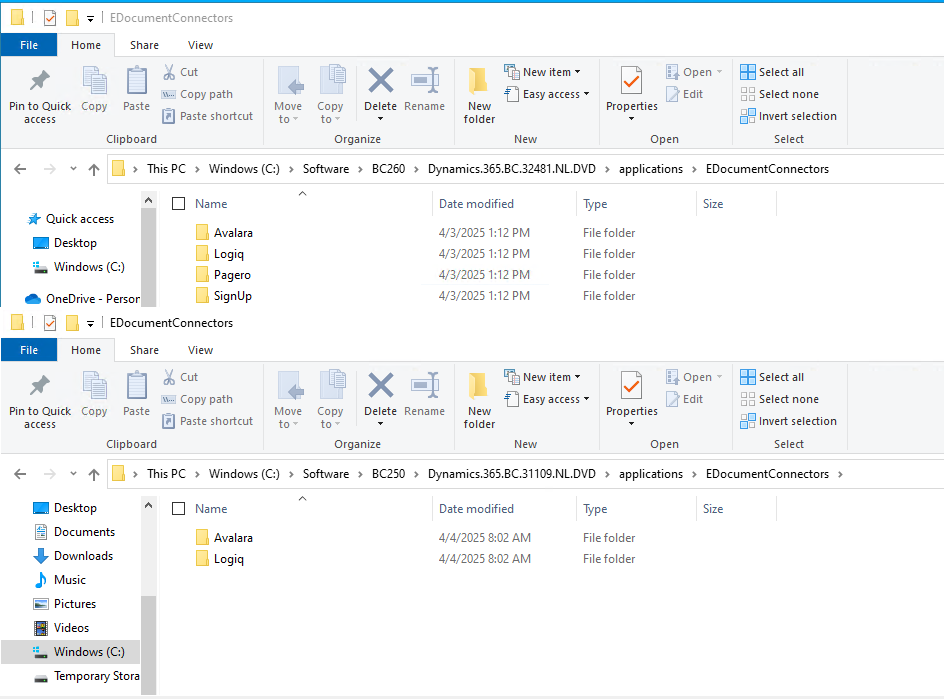
The commands would then look as follows.
Publish-NavApp -ServerInstance BC260 -Path "$appPathBC260\$dvdNameBC260\Applications\EDocumentConnectors\Pagero\Source\Microsoft_E-Document Connector - Pagero.app" -SkipVerification
Sync-NAVApp -ServerInstance $NewBcServerInstance -Name "E-Document Connector - Pagero" -Version $NewBCVersion -Tenant $tenantId
Start-NAVAppDataUpgrade -ServerInstance $newBcServerInstance -Name 'E-Document Connector - Pagero' -Version $NewBcVersion

Publish-NavApp -ServerInstance BC260 -Path "$appPathBC260\$dvdNameBC260\Applications\EDocumentConnectors\SignUp\Source\Microsoft_E-Document Connector - SignUp.app" -SkipVerification
Sync-NAVApp -ServerInstance $NewBcServerInstance -Name "E-Document Connector - Pagero" -Version $NewBCVersion -Tenant $tenantId
Start-NAVAppDataUpgrade -ServerInstance $newBcServerInstance -Name 'E-Document Connector - SignUp' -Version $NewBcVersion
More information about Microsoft Business Central can be found here. More information about the author of this blog post can be found here.