Postman is an API platform for building and using APIs. Postman simplifies every step of the API lifecycle and streamlines collaboration with systems like Business Central, allowing you to create better APIs faster. You can use it to test integrations via APIs coming from Business Central.
You can download Postman via this link.
Once you’ve launched Postman—either through the web or the app—and created a free account, you’ll arrive at the main screen.

You start by creating a Workspace via Workspaces at the top of the screen. If you want to follow the instructions from this blog, choose Blank Workspace, then Next, Only me, and finally Create. Of course, choose a name that’s relevant to you.
Once that’s done, click New next to Import, and select Environment. Again, choose a name that’s relevant to you. You can test the APIs from Business Central by entering the following values in Postman.
| Name | Value |
|---|---|
| ApplicationClientId | Value retrieved from Azure / From the output of the script below |
| ClientSecret | Value retrieved from Azure / From the output of the script below |
| TenantId | Value retrieved from Azure / From the output of the script below |
| CompanyName | 'CRONUS NL' |
| Table of environment variables | Postman API testing |
Variables in Postman using “{{" and “}}” and Business Central
In Postman, you use variables as follows. For example, for TenantId, the syntax is: {{TenantId}}. Don’t forget to save the variables, by the way. The Save button is located at the same level as the name of the Environment, just to the right of the Fork button. Below is an example of a URL with two variables.
https://api.businesscentral.dynamics.com/v2.0/{{TenantId}}/Production/ODataV4/Company({{CompanyName}})/CountriesRegionsAuthentication in Postman via a Collection
To set up authentication, click on “+” next to Collections in Postman and choose Blank Collection. You can immediately enter a name to overwrite “New Collection.” Type in WordPress Samples and select Authorization.
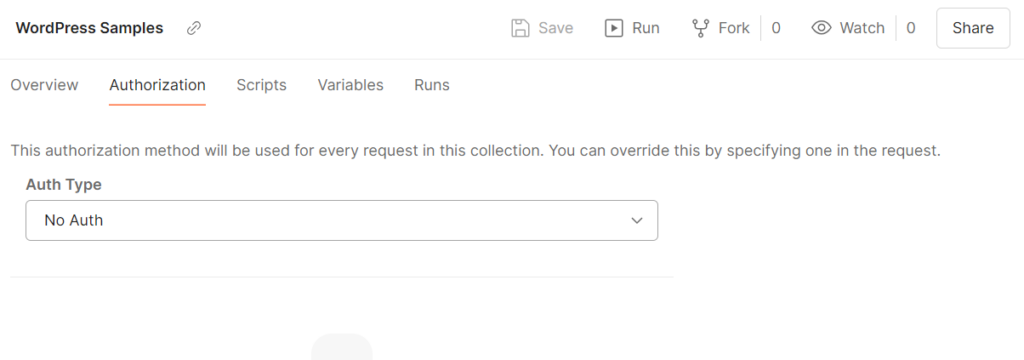
For Auth Type, choose OAUTH 2.0. Fill in the following values as shown in the table:
| Name | Value |
|---|---|
| Add auth data to | Request Headers |
| Current Token | Available Token |
| Header Prefix | Bearer |
| Token Name | WordPress Samples |
| Grant Type | Authorization Code |
| Callback URL | https://businesscentral.dynamics.com/OAuthLanding.htm |
| Auth URL | https://login.microsoftonline.com/**{{TenantId}}**/oauth2/v2.0/authorize |
| Access Token URL | https://login.microsoftonline.com/**{{TenantId}}**/oauth2/v2.0/token |
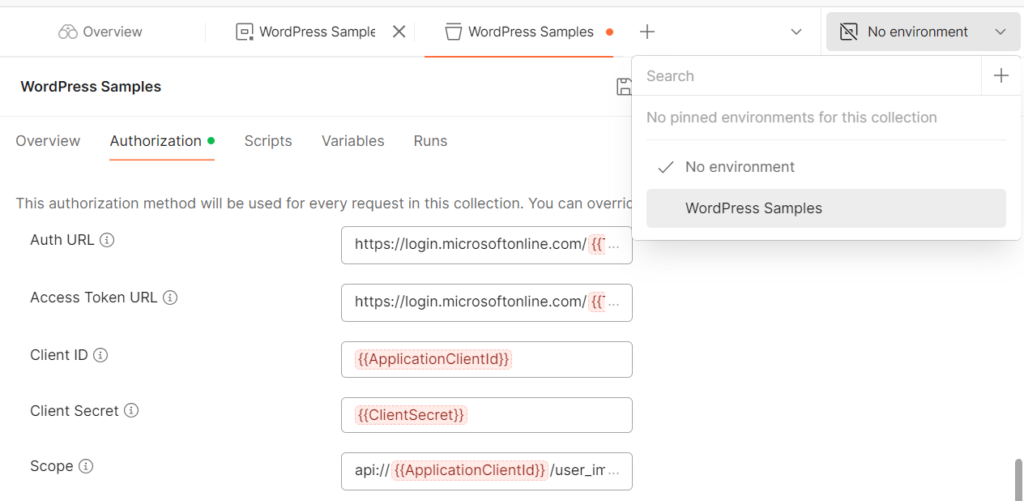
| Client ID | {{ApplicationClientId}} |
| Client Secret | {{ClientSecret}} |
| Scope | https://api.businesscentral.dynamics.com/.default |
| State | (leave empty or use a static value if needed) |
| Client Authentication | Send as Basic Auth header |
| Table of values for Authorization | Postman API testing |
Here too, make sure to save your changes. The variables might still be shown in red at this point because the environment variables have not yet been filled in, or the environment has not been matched to the collection. If it says “No environment” or the wrong environment in the top right corner, adjust it manually.
The following script will create the required Azure AD App registration. The file PS Variables.ps1 contains the $tenantId, $subscriptionId, $appName, and two file names as variables. By using $global:connected, you prevent repeated logins. This makes it possible to create a second new client secret. Since the client secret is required for the environment variables in Postman, it won’t initially be visible on screen. The application client ID and the client secret are securely saved in two text files. These can, however, be retrieved separately via the last function.
But be aware that this introduces security risks. This function is not executed by default.
PowerShell script uit te voeren in Visual Studio Code
# Begin Load Variables
. "C:\Temp\WordPress Samples\PS Variables.ps1"
Clear-Host
# End Load Variables

# Begin Reset $global:connected
# . "C:\Temp\WordPress Samples\Reset-GlobalParameter.ps1"
Clear-Host
# End Reset $global:connected

# Begin Function Use-Azure
Function Use-Azure {
    param (
        [string]$tenantId,
        [string]$subscriptionId
    )

    if (-not $global:connected) {
        Update-AzConfig -DisplaySecretsWarning $false | Out-Null
        Update-AzConfig -DisplayBreakingChangeWarning $false | Out-Null
        az config set core.enable_broker_on_windows=false --only-show-errors | Out-Null
        az account clear --only-show-errors | Out-Null
        az login --only-show-errors | Out-Null
        az account set --subscription $subscriptionId --only-show-errors | Out-Null
        Connect-MgGraph -TenantId $TenantId -Scopes "User.Read","Application.ReadWrite.All","Directory.ReadWrite.All" -NoWelcome | Out-Null
        $global:connected = $true
        Write-Host "Logon was successful"
    } else {
        Write-Host "Logon has already been done. No further action needed."
    }
}
# End Function Use-Azure
Use-Azure -tenantId $tenantId -subscription $subscriptionId

# Begin Function Add-AzureAdApp
Function Add-AzureAdApp {

    param (
        [string]$appName
    )
    try {
        if (-not $global:connected) {
            throw "Logon has not been done. Please run the Use-Azure function first."
        }

        # Get all applications and filter by display name locally
        $existingApp = Get-AzADApplication | Where-Object { $_.DisplayName -eq $AppName }

        if (!$existingApp) {
            # Create a new app registration
            Write-Host "App does not exist. Creating one."
            $newApp = New-AzADApplication -DisplayName $appName -ReplyUrls "https://businesscentral.dynamics.com/OAuthLanding.htm"
            $existingApp = Get-AzADApplication | Where-Object { $_.DisplayName -eq $appName }
            $servicePrincipal = New-AzADServicePrincipal -ApplicationId $existingApp.AppId
            Start-Sleep -Seconds 20
            Write-Host "App has been created. No further action needed"

            # Assign Contributor role
            New-AzRoleAssignment -ObjectId $servicePrincipal.Id -RoleDefinitionName "Contributor" -Scope "/subscriptions/$subscriptionId" | Out-Null
        } else {
            Write-Host "App already exists. No further action needed."
        }
    } catch {
        Write-Host "Error: $_"
    }
}
# End Function Add-AzureAdApp
Add-AzureAdApp -appName $appName

# Begin Function Add-MgADAppPermissions
Function Add-MgADAppPermissions {
    try {
        if (-not $global:connected) {
            throw "Logon has not been done. Please run the Use-Azure function first."
        }

        $existingApp = Get-AzADApplication | Where-Object { $_.DisplayName -eq $AppName }
        if (!$existingApp) {
            Write-Host "App does not exist. Create an Azure AD app registration first via Add-AzureAdApp"
            # Define the required resource access parameters here
        } else {
            $params = @(
                @{
                    resourceAppId = "996def3d-b36c-4153-8607-a6fd3c01b89f"
                    resourceAccess = @(
                        @{
                            id = "d365bc00-a990-0000-00bc-160000000001"
                            type = "Role"
                        }
                        @{
                            id = "a42b0b75-311e-488d-b67e-8fe84f924341"
                            type = "Role"
                        }
                    )
                },
                @{
                    resourceAppId = "00000003-0000-0000-c000-000000000000"
                    resourceAccess = @(
                        @{
                            id = "e1fe6dd8-ba31-4d61-89e7-88639da4683d"
                            type = "Scope"
                        }
                    )
                }
            )
            $app = Get-MgApplication | Where-Object { $_.DisplayName -eq $AppName }
            Update-MgApplication -ApplicationId $app.Id -RequiredResourceAccess $params
            Write-Host "Permissions added to the Azure AD App. No further action needed"
            $AppIdUri = "api://$($app.AppId)"
            Update-MgApplication -ApplicationId $app.Id -IdentifierUris @($AppIdUri)

            # Check if the scope already exists
            $existingScopes = $app.Api.Oauth2PermissionScopes | Where-Object { $_.Value -eq "user_impersonation" }
            if (-not $existingScopes) {
                $api = @{
                    oauth2PermissionScopes = @(
                        @{
                            AdminConsentDescription = "Allows the app to read the signed-in user's files."
                            AdminConsentDisplayName = "Read user files"
                            UserConsentDescription = "Allows the app to read your files."
                            UserConsentDisplayName = "Read your files"
                            Type = "User"
                            Value = "user_impersonation"
                            Id = $([guid]::NewGuid())
                        }
                    )
                }
                Update-MgApplication -ApplicationId $app.Id -Api $api
                Write-Host "Scope added to the Azure AD App. No further action needed"
            } else {
                Write-Host "Scope already exists. No further action needed"
            }
        }
    } catch {
        Write-Host "Error: $_"
    }
}
# End Function Add-MgADAppPermissions
Add-MgADAppPermissions

# Begin Function Add-AzureADSecret
Function Add-AzureAdSecret {

    param (
        [string]$applicationClientFile,
        [string]$clientSecretFile
    )

    try {
        if (-not $global:connected) {
            throw "Logon has not been done. Please run the Use-Azure function first."
        }

        $app = Get-MgApplication -Filter "displayName eq '$appName'"
            if (-not $app) {
                Write-Host "App registration does not exist. Skipping creation of secret."
            } else {
                Write-Host "App registration exists. Creating secret."

                $passwordCredential = @{
                    displayName = $secretDisplayName
                    startDateTime = (Get-Date)
                    endDateTime = (Get-Date).AddYears(2)
                }

                $newPassword = Add-MgApplicationPassword -ApplicationId $app.Id -PasswordCredential $passwordCredential
                $appSecret = $newPassword.SecretText
                Write-Host "De applicaton client ID has been created. No further actions needed."
                Write-Host "De client secret has been created. No further actions needed"
                $app.AppId | ConvertTo-SecureString -AsPlainText -Force | ConvertFrom-SecureString | Out-File $ApplicationClientIdFile # Adding to a file
                $appSecret | ConvertTo-SecureString -AsPlainText -Force | ConvertFrom-SecureString | Out-File $clientSecretFile # Adding to a file
            }
    } catch {
        Write-Host "Error: $_"
    }
}
# End Function Add-AzureADSecret

Add-AzureADSecret -applicatonClientId $applicationClientIdFile -clientSecret $clientSecretFile

# Begin Function Use-AzureADSecret
Function Use-AzureAdSecret {
    try {
        if (-not $global:connected) {
            throw "Logon has not been done. Please run the Use-Azure function first."
        }

        $app = Get-MgApplication -Filter "displayName eq '$appName'"
            if (-not $app) {
                Write-Host "App registration does not exist. Use Add-AzureADSecret first."
            } else {
                Write-Host "App registration exists. Showing secret on screen."

                Get-MgApplication -ApplicationId $app.Id | Format-List Id, DisplayName, AppId, SignInAudience, PublisherDomain
                $encryptedClientSecret = Get-Content -Path "$ClientSecretFile"
                $secureClientSecret = ConvertTo-SecureString -String $encryptedClientSecret
                $plainClientSecret = [System.Runtime.InteropServices.Marshal]::PtrToStringAuto([System.Runtime.InteropServices.Marshal]::SecureStringToBSTR($secureClientSecret))
                Write-Host "Your client secret is: "$plainClientSecret""
            }
    } catch {
        Write-Host "Error: $_"
    }
}
# Begin Function Use-AzureADSecret
# Use-AzureADSecret
The output of the PowerShell script is as follows:
<!-- wp:code {"canvasClassName":"cnvs-block-core-code-1742191199653"} -->
<pre class="wp-block-code"><code>Logon has already been done. No further action needed.
App already exists. No further action needed.
Permissions added to the Azure AD App. No further action needed
Scope already exists. No further action needed
App registration exists. Creating secret.
De applicaton client ID has been created. No further actions needed.
De client secret has been created. No further actions needed</code></pre>
<!-- /wp:code -->
If the final script is also executed, the output is as follows.
App registration exists. Showing secret on screen.

Id              : 78944730-918a-4fad-9fb3-4de17c67afe5
DisplayName     : WordPress Sample
AppId           : 303e8655-007f-4b82-ac10-35c160702d04
SignInAudience  : AzureADMyOrg
PublisherDomain : digitalemels.nl

Your client secret is:  ~v18Q~ttnjU6qg....
Once all of this is done, the token can be retrieved.
In Postman, go to Authorization within the Collection, and scroll all the way down until you see an orange button labeled Get New Access Token.
The result is, for example, an Access Token that can be used with Use Token.
Here we see an example of a partial token that can be debugged:
eyJ0eXAiOiJKV1QiLCJhbGciOiJSUzI1NiIsIng1dCI6IkpETmFfNGk0cjdGZ2lnTDNzSElsSTN4Vi1JVSIsImtpZCI6IkpETmFfNGk0cjdGZ2lnTDNzSElsSTN4Vi1JVSJ9.eyJhdWQiOiJhcGk6Ly9lZTFjYzQ3NS05ZjNlLTThis token can be debugged via JWT.io.

Postman and Business Central
Some steps also need to be taken in Business Central. After logging into Business Central and selecting the correct company, search for Microsoft Entra Applications and choose New from there. The Client ID is the Application Client ID that you used in Postman and that was generated via the script. As a tip, I recommend using the name of the Azure AD App registration (i.e., the value of $appName) as the Description. After changing the State from Disabled to Enabled, Business Central will create an application user.
The following permission sets are typically required:
| Permission Set | Description |
|---|---|
| D365 AUTOMATION | Dynamics 365 Automation |
| EXTEN. MGT. – ADMIN | Extension Management – Admin |
| Table of permission sets | Business Central Entra Application |
Granting consent is the final step. A Global Administrator must grant the consent.

Start testing within Postman using a Business Central URL
To perform a test in Postman, you first need to copy a URL from the Web Services in Business Central. I have already prepared an example URL suitable for Postman.
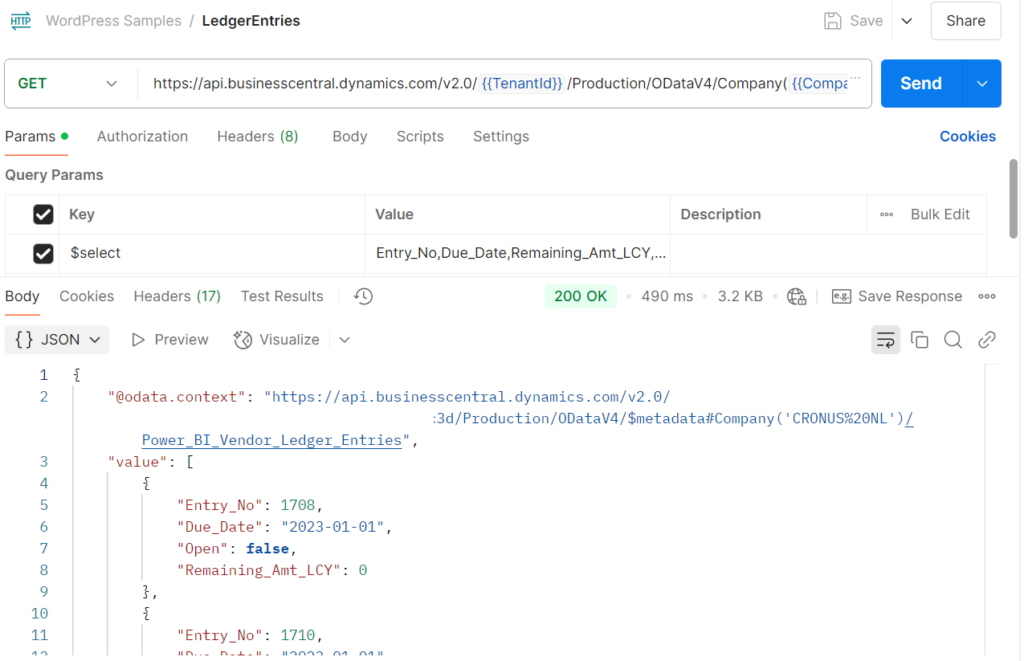
Now, let’s go back to Postman. In Postman, choose Add a Request located under the name of the Collection. Here again, enter a relevant name—for example, Ledger Entries. Next to GET, paste the URL mentioned above. Under Authorization, select Auth Type: Inherit auth from parent. Before clicking Send, make sure to save this request.
The result will be a 200 OK response:
Meer informatie over Microsoft Business Central vind je hier. Meer informatie over de auteur van deze blog post vind je hier.