Windows 11 users may be losing data due to Microsoft’s enforced BitLocker encryption.
At the very least, such reports are becoming more frequent. Thus, you can read more about it in the blog below. I also explain how you can easily prevent data loss after the Windows 11 update.
What is BitLocker
BitLocker is a built-in feature in Windows that allows you to encrypt the contents of your hard drive (secure it with encryption). This prevents unauthorized access to your data, even if you had to report your PC as stolen. Only someone with the correct password or recovery key can unlock the data.
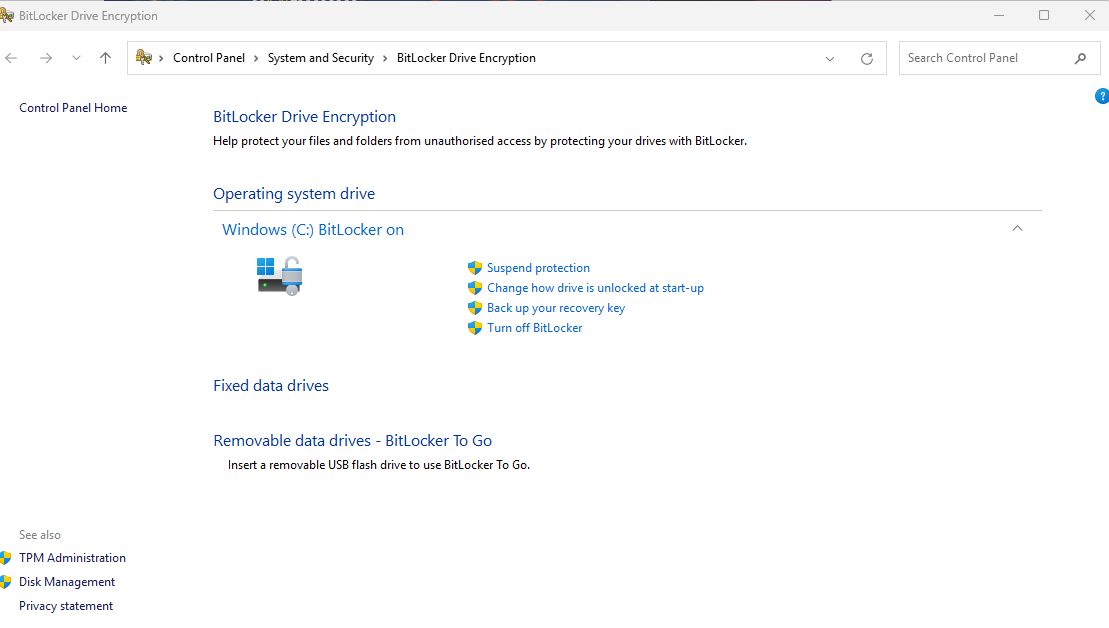
Where can you find BitLocker in Windows 11
- Click Start 🔍 and type BitLocker or Control Panel.
- Open Control Panel → System and Security → BitLocker Drive Encryption.
- You can identify and manage encrypted drives or disable BitLocker there.

Windows 11 usually enables BitLocker by default on modern laptops, especially if you use a Microsoft account during setup.
That was the case until recently — in the old situation.

New Situation
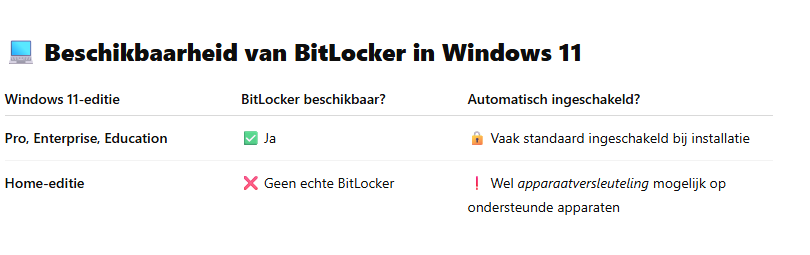
Microsoft has therefore enabled BitLocker encryption by default in Windows 11 version 24H2, even on Windows 11 Home editions. This means that during a clean installation or reinstallation of this version, Windows automatically encrypts all drives without explicit user consent. While this increases security, users lose their data when they don’t save their recovery keys or don’t know that their drives are encrypted. Preventing data loss in this Windows 11 version is, therefore, particularly important with this update. Of course, your data doesn’t get lost after this update, so the intent is certainly not to cause panic.
It mainly concerns the following situations
For example, the hard disk fails, and you need to reinstall Windows 11 on the same PC after fixing the hard disk issue. If the user did not create the BitLocker recovery key, they will encounter this problem. After the relevant update, Windows enables encryption via BitLocker. Even if you want to refresh Windows 11 to start fresh, you will need this key.
A kind of workaround to prevent data loss after the update, but not really
Before performing a refresh of Windows 11, you can, of course, first turn off or pause BitLocker. This is a best practice. Even if you want to update the BIOS of the computer itself, Windows 11 does this for you. If something goes wrong during this process, you’ll still have an issue if you don’t have the recovery key at hand.
Best practice to prevent data loss after the update
BitLocker requires users to save a recovery key in order to retain access to their data in the event of system issues. However, many users are unaware of this requirement, especially since the encryption happens automatically without a clear notification. This has led to cases where users cannot recover their data after a system crash or update due to missing recovery keys.
Additionally, software-based BitLocker encryption can significantly reduce SSD (hard disk) performance, by up to 45% in some cases. The encryption tasks are performed on the CPU, which increases the load and reduces system performance. In my personal opinion, enabling this security is indeed necessary in today’s time.
Microsoft has yet to release an official statement on these issues. Users are advised to securely store their recovery keys and be aware of automatic encryption when installing or reinstalling Windows 11 version 24H2. Of course, that’s quite a vague piece of advice.
Below are the steps that every Windows 11 user (enterprise customers / consumers with a Windows 11 Home PC) should take to prevent hard drive loss.
Steps to prevent data loss after an update
- Open the Control Panel
- Click Start and type Control Panel.
- Select Control Panel from the search results.
- Go to BitLocker settings
- Click on System and Security.
- Click on BitLocker Drive Encryption.
- Back up your recovery key
- Find the drive where BitLocker is enabled (usually C:).
- Click on Back up your recovery key next to the relevant drive.
- Choose a method to store the key You will now have several options:
- Save to your Microsoft account: The key will be stored in your Microsoft account and accessible via https://aka.ms/myrecoverykey.
- Save to a USB flash drive: Store the key on a USB stick.
- Save as a file: Save the key as a text file in a secure location.
- Print: Print the key and keep it in a safe place. You can use print-to-PDF and email the PDF to yourself or save the PDF to a secure location (not on the respective PC).
Recommended: Save the key to your Microsoft account and create a local backup (e.g., on a USB stick or as a printout)
Confirm the backup to prevent data loss after the update
After choosing a storage method, follow the on-screen instructions to complete the process.
You can find a Dutch version of this blog post here.